Reports: Amount Payable
Simon Clement
2014-06-12T07:16:24+10:00
June 2014

Reports: Payments received
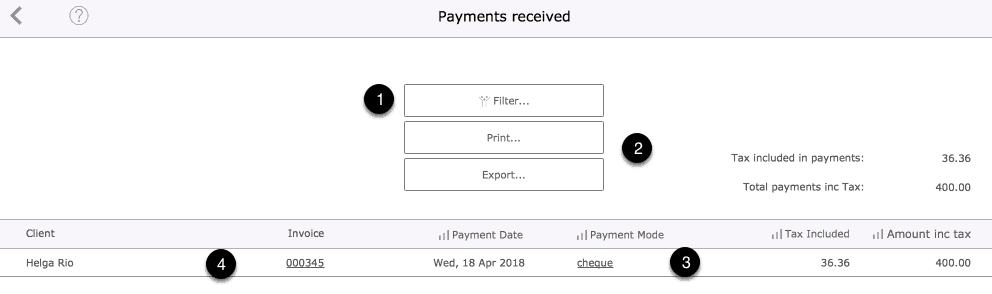
Simon Clement 2018-04-19T13:54:36+10:00- Use this report to report on payments received from clients from artwork sales for a specified date range.
Features
- Use the filter to specify a date range or enter the same date in both fields to specify a single date and, where required, specify to filter who made the payment.
- Export details of filtered result in a format suitable for use in a spreadsheet.
- Edit the method of payment.
- Review details of the original sale with the option to move directly to the original invoice.
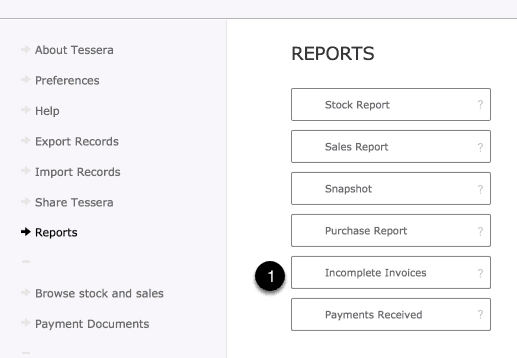
Reports: Incomplete Invoices
Simon Clement 2018-04-19T13:53:17+10:00Incomplete Invoices
- This reports lets you review any invoices that don’t have a zero balance. This will include invoices with amounts outstanding as well as invoices is in credit.
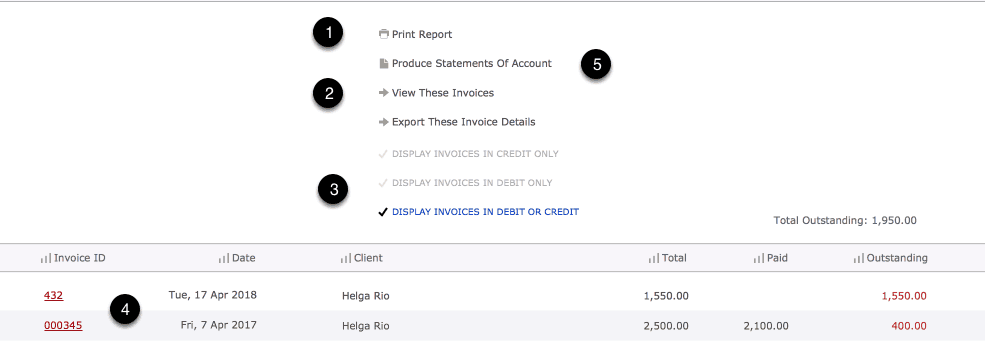
Incomplete Invoices
- Access the Produce Statements screen where statements of account can be printed for individual clients.
- Leave this screen and move to the Invoice Component to view all unpaid invoices individually.
- Select which type of incomplete invoices will be displayed
- Invoices in credit are also considered to be incomplete.
- Click on underlined items for more details
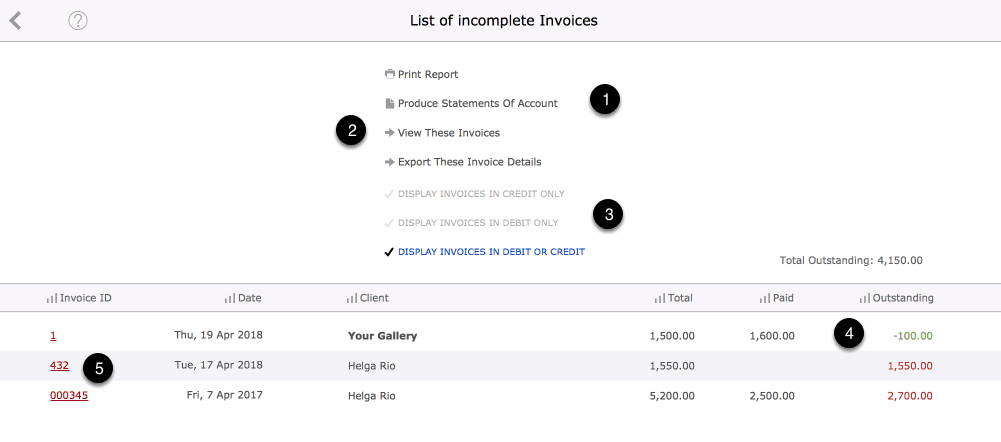
Print Statements
- Select to produce statements of account
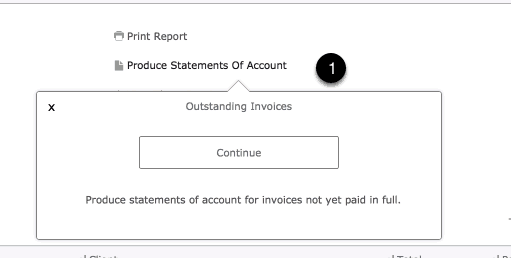
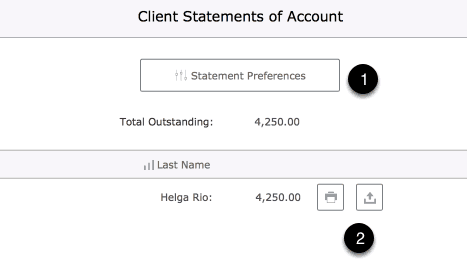
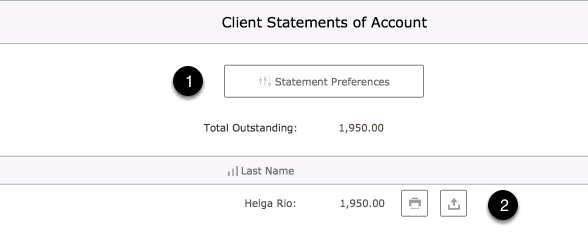
Statements of Account
- Control the appearance of printed statements
- Either print or copy details to the Clipboard
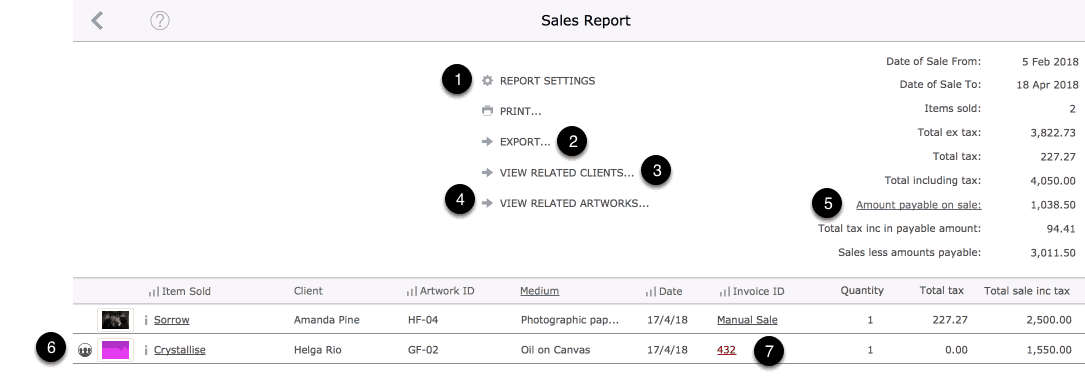
Report: Sales Report
Simon Clement 2018-04-19T13:30:23+10:00Sales Report
- Produce a custom report detailing sales for particular clients, artists and date ranges
Sales Report Features
- Use Report Settings to control which items and which date range are to be displayed.
- Report contents can be exported to a spreadsheet for further analysis.
- Move to the People Component where all the clients involved in the displayed sales will be displayed.
- Move to the Artwork Component to the list Screen where all artworks displayed will be displayed.
- If amounts payable are required to be made on the sale of artworks then the totals are included giving a more accurate result for the amount received from sales.
- This icon indicates an amount is payable on the sale of this artwork. Use the icon to reveal more details.
- Artworks can be sold by adding them to an invoice or by manually marking them as sold from the Artwork Stock/Sales screen. Use this buttons to reveal more sales details.
- See more details on the individual items sold by using this button.
Reports: Stock Report
Simon Clement 2018-04-18T12:37:17+10:00Stock Report
- Use the Stock Report button for inventory reports

The Stock Report lets you review, print or export details of your stock.
- Use the filters under settings to filter available stock. Filter options include:
- The ability to filter by owner letting you produce inventory reports for individuals
- Control how the report is sorted
- Filter by a combination of Medium, Category, Artist and other values.
- You can also specify that reports only include those artworks marked as consigned into Tessera. This allows you to produce reports for specified artists detailing artworks they have consigned into Tessera.
- Leave this screen and return to the artwork component where all artworks currently shown in the filter will be displayed.
- Export the filtered result to a spreadsheet.
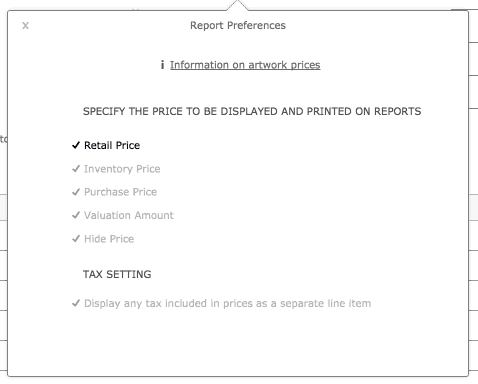
- Use Report Preferences to specify what pricing details should appear on the report. Use today’s date for the current stock level. Use SELECT INVENTORY DATE… to specify a date in the past. It may take some time to recalculate the stock levels for an historical date.
- Edit the price to be displayed on the report. This can also be edited using Report Preferences.
- This artwork has one or more artworks out on consignment. Click on the icon for more details.
- These artworks are marked as having been consigned into Tessera.
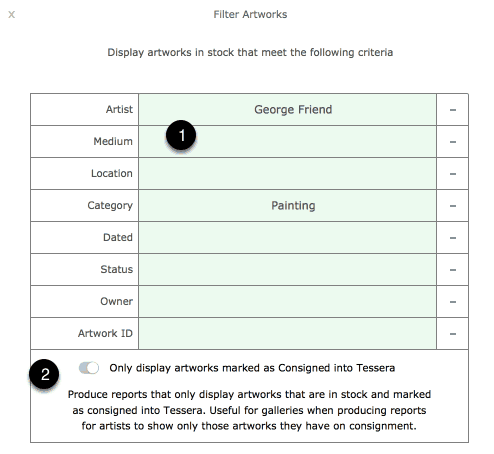
 Using the Stock Filter
- Use these menuas to select which items will be displayed in the report. Here the only artwork selected to be displayed are those by George Friend that belong to the category of Painting.
- There will be times when you only want to include artworks consigned into Tessera. This allows you to produce a report for an artist or owner that displays the artworks they have consigned to you.
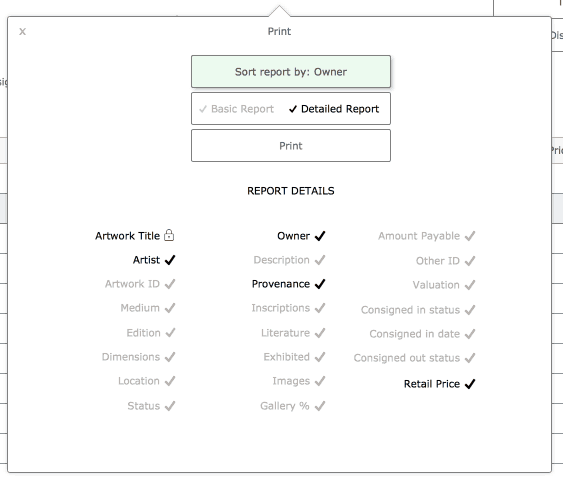
Stock Report Printing controls
Control the amount of detail and the format of the printed report.
Report Preferences
Control the amount of pricing detail to be included on the final printed report. Includes the options to hide all pricing which is useful as it allows you to provide to an artist a record of all the stock you hold of their work without revealing your pricing choices.
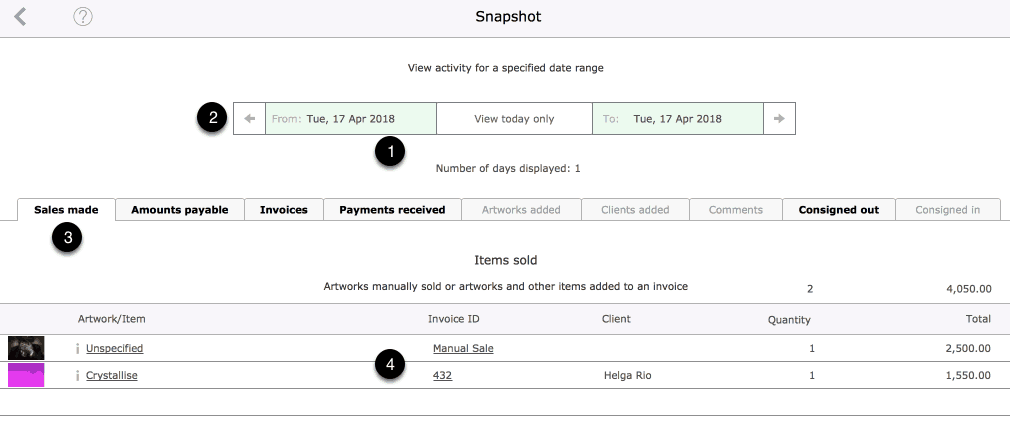
Reports: Snapshot Report
Simon Clement 2018-04-19T13:21:02+10:00Snapshot Report
- An overview of any activity within Tessera for a specified date-range.
Controls
- Enter a date-range in the provided fields to show related activity. Use the View Today Only button to automatically enter today’s date in both fields.
- Move back or forward a selected number of days
- Highlighted tabs have activity for the date range specified.
- Review more details for each item.
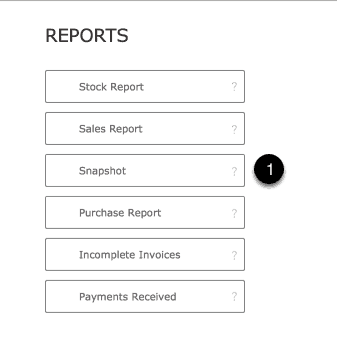
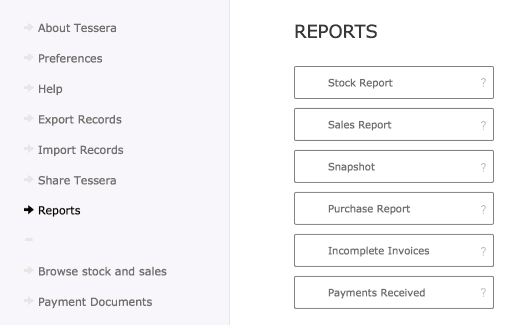
Reports
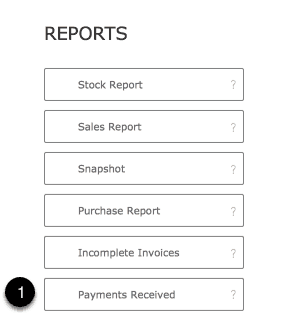
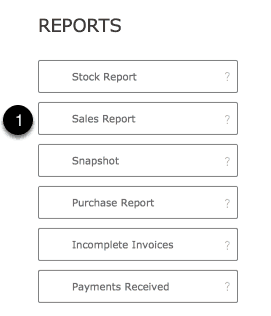
Simon Clement 2018-04-17T21:47:02+10:00Available Reports
- Stock Report: Report on inventory levels.
- Sales Report: Report on sales.
- Snapshot: Details all activity across Tessera for a specified date range.
- Purchase report: If you enter your purchasing prices when you enter stock you can report on them here.
- Incomplete Invoices: Report on incomplete invoices and produce statements of account. See the Invoice help files for more details.
- Payments received: Report on invoice payments made by clients.
Statement of Account
Simon Clement 2018-04-17T20:35:27+10:00If you have invoices outstanding you’ll want to produce statements for clients.
- Access the Reports screen from the Tessera screen and use the Incomplete Invoices button.
Incomplete Invoices
- Print a list detailing all amounts currently outstanding.
- Leave this screen and return to the Invoice Component to view all unpaid invoices listed on screen.
- Access the Statements of Account screen where statements can be printed.
- Click on invoice button for more invoice details.
Printing and exporting statements
Use Produce Statement to access this screen.
- Specify how statements will look once printed using Statement Preferences.
- Select a statement to print or copy to the Clipboard.
Invoice Preferences and Design
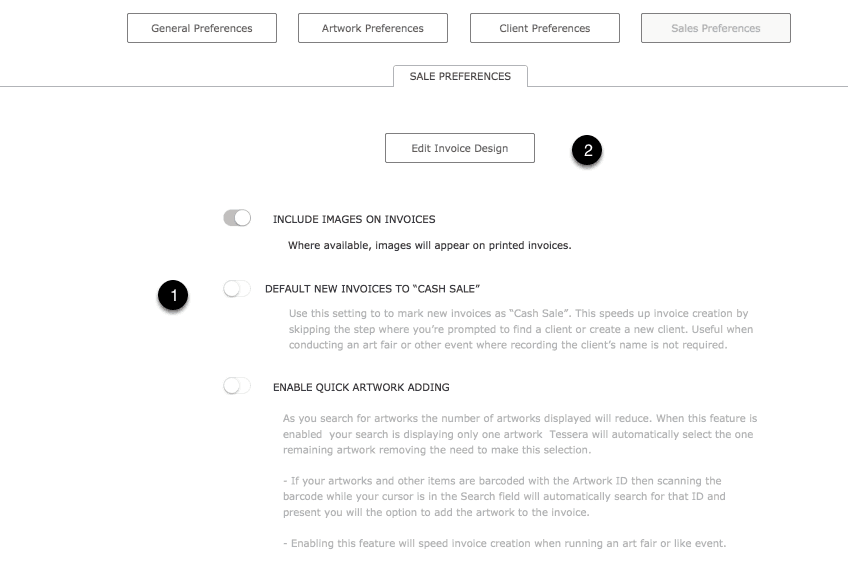
Simon Clement 2018-04-17T20:18:37+10:00Invoice Design
- Use the PREFS button from anywhere in Tessera or from the Tessera Screen Home Screen to amend a wide range of settings for the appearance of your printed invoice.
Settings for Invoices available on the Preferences Screen
- Under the Sales Preferences screen there are options with explanations for regularly used features.
- Use this button to access a screen to design the invoice and control the invoice numbering scheme.
Invoice Design
- Clicking on highlighted regions reveals explanatory text. Use the Preview Button to review your amendments.
- Use Invoice ID Settings to control if an Invoice ID should automatically be entered and the formatting of the entry.

Selling artworks using invoices
Simon Clement 2018-04-17T13:45:00+10:00If you have a Tessera Pro licence you can sell artworks by creating an invoice and adding artworks or by making a manual sale. Without a Tessera Pro licence you sell an artwork by completing a manual sale.
Creating Invoices
- To create a new artwork either use the Keyboard shortcut of Cmd-N or use the New button.
Search for a Client
Once you’ve used the new button you’ll be prompted to find a client. Either select an existing client, create a new client or, if there is no client specified for this invoice, select Cash Sale.

Search for an Artwork
You’ll now be taken to the screen to find an artwork, or other item, to add to the invoice.
- Start typing the Artwork Title or the Artwork ID to filter the listed artworks. You can also narrow your search down to specify categories or artists using the filter fields provided.
- Use this button to add any other item to an invoice. Once entered onto invoice you can adjust tax settings and amounts if need be.
- Open the Invoice Preferences Screen to adjust settings. One setting is the ability to set Auto-Select on in which case once your search has narrowed the artworks found to one artwork you’ll automatically jump to the next input screen. This is useful if using a barcode scanner to scan items while the cursor is in the search field as you don’t need to click on the single item your search has found to add it to the invoice.
- Select to hide or show artworks with no stock or hide images to reduce search times.
- Use this button to add the artwork to the invoice.
- If need be open the Artwork Dashboard to the selected artwork to allow further adjustments.
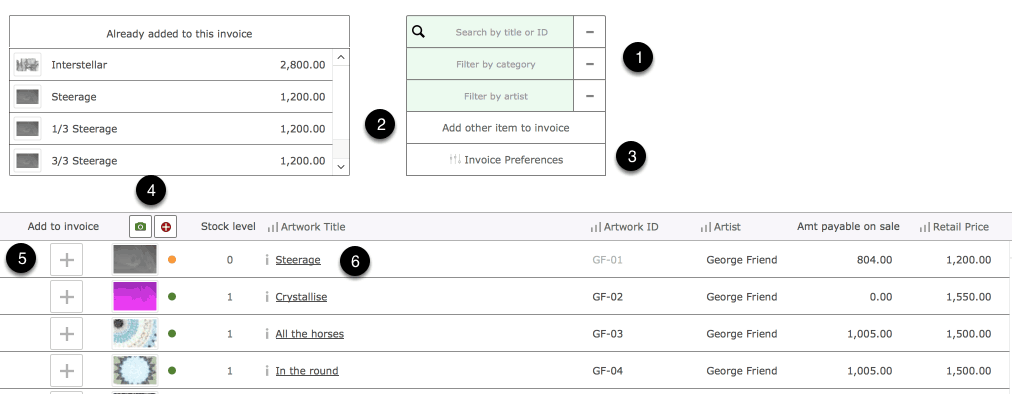
Once you’ve used the button to add the artwork to an invoice your taken to a screen to check details and select the required item of stock.
Adding items to an invoice
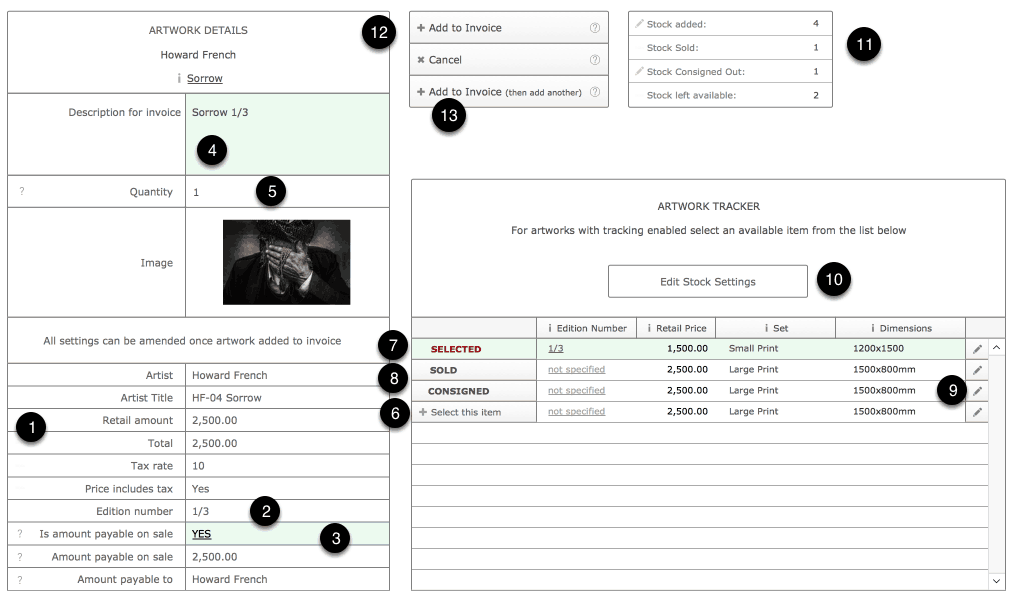
- Once you’ve selected an artwork to be added to an invoice you’re presented with the details of the artwork before you commit it to the invoice.
- Any relevant edition number is entered here based on the item of stock you’ve selected to add from the Artwork Tracker.
- The Invoice Price is taken from the artwork but can be altered here before you add it to the invoice, or anytime after it’s been added to the invoice. Amending the retail price on this screen doesn’t affect the artwork record price details.
- The description of the artwork entered here will appear on the printed invoice and have been automatically entered based on your Invoice Preferences settings. You can amend this entry now or edit it at anytime once it’s been entered onto the invoice.
- Specify the Quantity of items you’re adding to the invoice. If there aren’t enough items in stock you’ll be prevented from adding this artwork until stock levels have been increased. If an artwork where Tracking is enabled then the stock level will always be set to 1.
- Use these buttons to select the item of stock to be added. For artworks with a single entry then the stock item will be automatically selected.
- Once selected the item will be highlighted in green.
- If items have already been sold or consigned out from Tessera then it will be shown here and clicking on these buttons will display more details.
- If the artworks have been assigned to sets then use the edit button to amend price and dimension and other details for this artwork. See the help pages on managing stock for more details.
- Amend the amount of stock available or any other details for the stock for this artwork.
- Review stock levels for this artwork.
- Use this button to add the artwork to the invoice. Use the cancel button to leave the invoice unaltered.
- Add this artwork to the invoice and then move immediately to the screen to find another artwork. This helps speed data entry when you have several artworks to add.
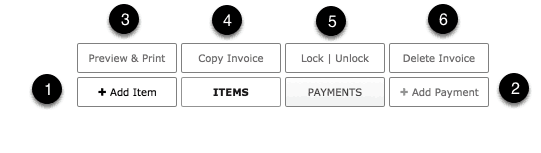
Other invoice features
- Add artworks or other items to this invoice.
- Add any number of payments.
- Print the current invoice.
- Use the Copy button to copy the text of the invoice which you can then email or format in a different program.
- Invoices can be locked preventing inadvertent alterations and, if security is enabled, you mayl require a password to unlock the invoice.
- Delete invoice. You’ll need to remove items from invoice before doing so.
Preferences
- Access preferences to control the printed appearance of invoices, how the serial number for invoices is automatically incremented and other details.