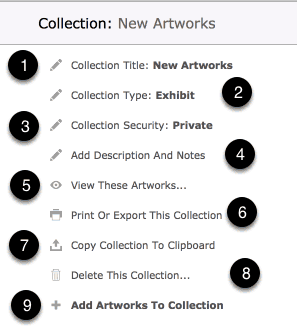
The Invoice Component
Simon Clement 2014-06-10T11:35:01+10:00The Invoices/Sales Component
Available only with a Tessera Pro licence
Note: Artworks can also be marked as sold from the Artwork Component without having to raise an invoice. See the Artwork Component for more details.
- The Sales Component is where you create invoices, add artworks and other items, and make payments.
- Basic Invoice Details
- Invoice Date The date that appears on the invoice and the date the artwork is considered sold.
- Invoice ID This is controlled by the settings in Invoice Preferences.
- Comments Any number of comments can be added and comments can be marked as requiring attention. Comments requiring attention are listed in the Home screen under the Active Comments report.
- Invoice Terms are printed on the invoice and can be used for general comments.
- Sale Location Selling artworks from more than one location? Use this field to mark records accordingly. You can filter Sales Reports by Location.
- Sold by When security is turned on you can specify who was responsible for the sale.
- Exchange Rate Enter a foreign exchange rate to be used for this invoice only.
- Billing address looked up from from the person’s record. This can be edited. Shipping address can also be included and is only printed if it differs from the Billing Address.
- Invoice Tool Bar
- Add Item Use this to add artworks or other items to this invoice.
- Add Payment Record payments made against this invoice.
- Print Print the current invoice.
- Copy Copy the text details of this invoice so you can email them or format them in another program.
- Lock/Unlock Invoices can be locked preventing inadvertent alteration. If security is enabled then a password will be require to unlock the invoice.
- Line ItemsThis is where items that have been added to an invoice are listed.
- Use the Sort button to items into order.
- Cicking the Yes button for information on line items where an amount is payable on sale of the artwork.
- Delete line item entries.
- Select a line item for more details.
- Payments Use this tab to access fields for entering payment amounts.

Editing line Items
- Select a line item to edit.

Line Items
- If the item being sold is an artwork then the details will appear here. Use the button to view more information with the option to move to editing the artwork itself.
- When you add an item to an invoice details are looked up from the related artwork and formatted according to your Preference settings for invoices. Use the > Reset to default button found under the “?” button to restore the contents of this field back to your default settings.
- The Artist and the Owner will have been looked up from the artwork at the time you entered this item onto the invoice. If need be you can amend these entries. Alterations to these entries has no effect on the original artwork. Make sure these entries are correct as they will affect sales reports and your history of who sold what and when it was sold.
- Details of the edition you chose to connect this entry to when you added this item to the invoice.
- Category is also looked up from the artwork at the time of sale. Make sure it’s correct so that reports are accurate.
- The retail price is looked up from the artwork but can be altered here without affecting the original artwork price.
- Discounts can be whole amounts or a percentage. If you want to discount all items on an invoice you will need to do so on a per item basis.
- Tax rates will have been entered based on your Preference settings but can be amended where required.
- Quantity can be altered once you’ve entered an item.
- Amounts may be payable once an artwork is sold and if you’ve set up an artwork to reflect this then an entry may have been made automatically. You can delete this entry or add additional entries. Select an entry to amend the payable details.

Amounts Payable
- Once you’ve selected a payable amount you can view it’s settings and amend to whom the amount is payable if need be. The only people who appear in this drop-down menu are those marked as Owners in the People Component.
- If you are using the percentage to calculate the payable amount then this will be based on the amount this item is sold for as indicated on the line item for the invoice.
- Either deduct your gallery percentage from the invoice amount or specify a fixed amount you’d want the payee to receive.
- These fields display the result of your settings and you can select whether or not tax is included in the final payable amount.

Amounts Payable:
- Once a payable amount has been added onto a Payment Document you can’t amend the payable amounts and you’ll see this screen instead of the one above.
- Use this button to go to the Payment Document. You can remove the item from the Payment Document and return to this screen if you do need to make an adjustment.

Making Payments
- Access the Payment area by using the Payments button..
-
Use the Add Payment button to add a payment or select an existing line entry to edit it’s details.

Payment Details
- Any number of payments can be added to an invoice and in Preferences you can specify if they are to appear on the invoice. Payments are linked to the client’s file and can be viewed on their Dashboard or reported on in the Reports Component of Tessera.