Simon Clement

About Simon Clement

This author has not yet filled in any details.
So far Simon Clement has created 100 blog entries.

March 2017

Tessera 405

2017-03-08T17:18:54+11:00

• Consignment documents now display artwork details as expected when artworks added to document

• Artwork Batch Screen now includes ability to select a keyword and apply it to all of the artworks being browsed.

• Artist Documents now have the option to greater range of details on printed document.

• Ability to password protect the file on opening in addition to the security enabled from the User Security Feature

• Tessera waits when closing for a few seconds to give users a chance to cancel closing. This feature can be disabled in Preferences.

• Ability to filter existing Payment Documents by date including display of totals. This gives you the option of reviewing all items paid out for a given period.

• Artwork Editions belonging to the same artwork can now be divided up into “Sets”. Each set can have different default dimensions, location, price etc. Individual editions belonging to an artwork can over-ride these settings and have their own price, location etc.

• Images can now be manually sorted. Where images appear in pop-over windows you can now scroll through all images available for the current artwork


Tessera 405 2017-03-08T17:18:54+11:00

January 2017

Tessera 404

2017-01-15T13:07:53+11:00

• User preferences and registration details imported from old version as expected.

• Custom fields can now be deleted where required.

Tessera 404 2017-01-15T13:07:53+11:00

Starred Fields

2017-01-02T09:42:35+11:00


There are a number of fields in the Artwork Component accompanied by “Starred” buttons. This indicates that the field also includes the option to add additional values beyond what can be added to the field itself. For example it may be for historical works that there are a number of different titles under which the artwork is known. Clicking on the Starred icon reveals a field that allows you to add any number of additional values, once an initial value has been added in the primary field, where each value is separated by a new paragraph.

Fields in Tessera accompanied by a star icon belong to The Dublin Core Metadata Element Set. This is a vocabulary of fifteen properties for use in resource description widely used by a range of organizations interested in facilitating movement of data between organizations.

Use of these fields in Tessera allows data to be moved out from Tessera in a format suitable and familiar to many other bodies who utilize the Dublin core standard.

For more information use the button provided under the starred icon.


Starred Fields 2017-01-02T09:42:35+11:00

December 2016

Tessera 403

2017-01-02T14:26:38+11:00

403.2

• Invoice lines now appear on invoices as expected.

403.1

• Preferences and registration now import s expected.

403

Amendments

• Invoice numbers now increment as expected.

• Duplicate keywords and Custom field names now allowable.

New Features

Artwork Edit screen now features a multi-screen layout allowing quick and easy access to artwork features.

Up to twenty Custom fields now accessible at any one time.

New artwork screen now includes a wider range of fields.

Artwork image names now appear where possible with images.

Image names are searchable under Artworks Advanced Search.


Tessera 403 2017-01-02T14:26:38+11:00

Manage Stock

2016-12-02T20:14:50+11:00

Stock added

The Manage Stock button gives you access to the Stock/Sales Screen where you add and adjust stock levels for the current artwork.

When an artwork is created at least one item of stock is likely to have been automatically added. You can amend this number using this button and can add or remove stock by adding new stock records. The current level of stock is calculated as a product of all the stock you’ve entered, less stock sold and less stock out on consignment.

(For detailed stock reports use the Inventory Report accessible from the Reports screen accessed via the Tessera screen).

NewImage

Managing Stock Levels

To add more stock access the Stock/Sales management screen from the Artwork Edit screen.

NewImage

Adding stock and managing the purchase price of an artwork

  1. Information on the Stock/Sales screen shows that for this artwork shown two entries have been made. One for one artwork and one for two artworks. This suggests that this artwork would be an item you regularly sell that can be restocked such as jewellery or ceramics.
  2. The calculation used to show the remaining artworks in stock. Placing artworks out on consignment reduces the total amount of stock available.
  3. To add additional stock for the current artwork use the Add Stock button.NewImage

Adding Additional Stock

  1. Enter the date of stock entry as this will be used in any Purchase Report you run from the Tessera Screen which report amounts spent for specified date ranges.
  2. For general comments.
  3. Enter the amount for the individual price for this artwork
  4. Mark when artworks include tax in the Purchase Price.
  5. Tax rates will have automatically been entered from settings entered in Tessera Preferences.
  6. Where need be the tax amount can be entered manually.
  7. Enter the number of stock items. Entries can be amended to zero for if need be. e.g. An artist has taken an artwork back into their studio but you want to keep a record of the artwork details while maintaining accurate stock reports.NewImage

Sales of this artwork

The Sales button also takes you to the Stock/Sales screen where you can review the sales for the current artwork. For accurate and detailed sales reports use the Advanced Sales Report.

NewImage

Consignments

Artworks can be placed out on consignment using the Tessera Consignment feature which is accessed from the Tessera screen. On the artwork edit screen screen the consignment field will display the number of consignments on which the current artwork is featured. Click through to the Stock/Sales screen where the related consignment reports are listed and from where they can be accessed and edited.

NewImage

Manage Stock 2016-12-02T20:14:50+11:00

November 2016

Installing Tessera on a Mac

2017-10-05T21:10:36+11:00

Download Tessera from arawak.com.au

  1. Once downloaded you’ll find the Tessera.dmg download in your designated download location which is likely to be your Downloads folder.
  2. If it hasn’t already been opened then double-click on the Tessera.dmg icon and the Tessera Volume icon will appear on your Desktop.

DMG The Tessera Volume Icon NewImage

Copying Tessera to your Applications folder

  1. Double-clicking on the Tessera Volume Icon opens the window below and from here you drag and drop the Tessera folder onto the provided Application Alias. After a moment a copy of Tessera will have appeared in your own Applications Folder.

Tessera install Locate the Tessera Folder

  1. The Tessera Folder in your Applications Folder now contains the Tessera App and your Tessera data file.

NewImage

Contents of the Tessera Folder

  1. The data file contains any information you enter into Tessera and should be part of your daily backup routine.
  2. The Tessera App can be dragged into your Dock if you want to place it in an easy to reach location.

(The Tessera App and the Tessera data file need to remain in the same folder and should not be renamed).

NewImage

Once Tessera has been installed you can close the installer window and safety delete the Volume Icon and the .dmg icon (1).

NewImage

Installing Tessera on a Mac 2017-10-05T21:10:36+11:00

Installing Tessera on Windows

2017-10-05T21:16:28+11:00

Download Tessera from arawak.com.au

On opening the downloaded Tessera.exe file you’ll be presented with a dialog prompting you to install Tessera on your PC. Options will include installing shortcuts. The default Location is set to be the base level of your C drive rather than your Programs or Documents folder.

The Tessera folder contains both the Tessera Application and the Tessera Data file. This data file is constantly being modified as you use Tessera. Windows does not expect programs to be altering in this manner which is why Tessera is placed where it is. Try the Tessera in other locations on your PC. The Documents folder should be suitable but you may experience difficulties if Tessera is placed in the Programs folder.

To uninstall Tessera access the uninstall feature via your Control Panel settings.

If you have problems once Tessera is installed with entering data it may be that there’s a problem on the properties set for the Tessera folder. It may be set to “Read Only” which will prevent the entry of data .

  1. Open File Explorer, and then Tessera folder.
  2. Right-click the folder, click Properties, and then click the Security tab. (This step will vary depending on what version of Windows is in use).
  3. Click the Advanced button. …  (This step will vary depending on what version of Windows is in use).
  4. Make sure the folder and it’s contents are not set to “Read only”

NewImage

Installing Tessera on Windows 2017-10-05T21:16:28+11:00

Sharing Tessera

2018-05-02T16:01:08+10:00

To share Tessera you need: A copy of FileMaker Pro running Tessera with sharing enabled. Or to be running the Tessera using FileMaker Server. Or to be hosting Tessera using FileMaker Cloud.

Sharing Tessera without networking

There are many ways to share the Tessera data file without use of FileMaker Pro. Sharing in this way has limitations and potential drawbacks but is an option in some scenarios.

Sharing Tessera with networking using FileMaker Pro

When shared more than one person could be adding artworks, creating invoices or making changes to client records and all the changes will be visible to all the users simultaneously.

Each Mac or PC will need to have a licensed copy of FileMaker Pro installed. (iPad or iPhone users need a free copy of FileMaker Go to access a copy of Tessera hosted using FileMaker Pro).

FileMaker Pro is an application from filemaker.com that lets users create and run FileMaker Pro files such as Tessera. One of the computers hosts the Tessera data file using FileMaker Pro while the other users are guests of this hosted file which they also open using FileMaker Pro. This is the ideal situation for a few users wanting to work on one copy of Tessera. The users need not be on the same local network as long as you have internet access and the hosted copy of Tessera is open on the host computer. See FileMaker’s help files for more details.

Enabling Sharing

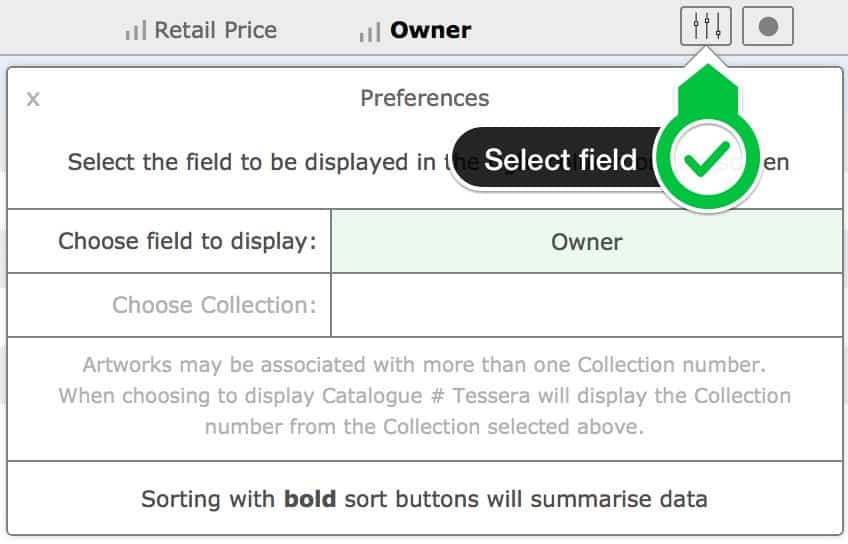
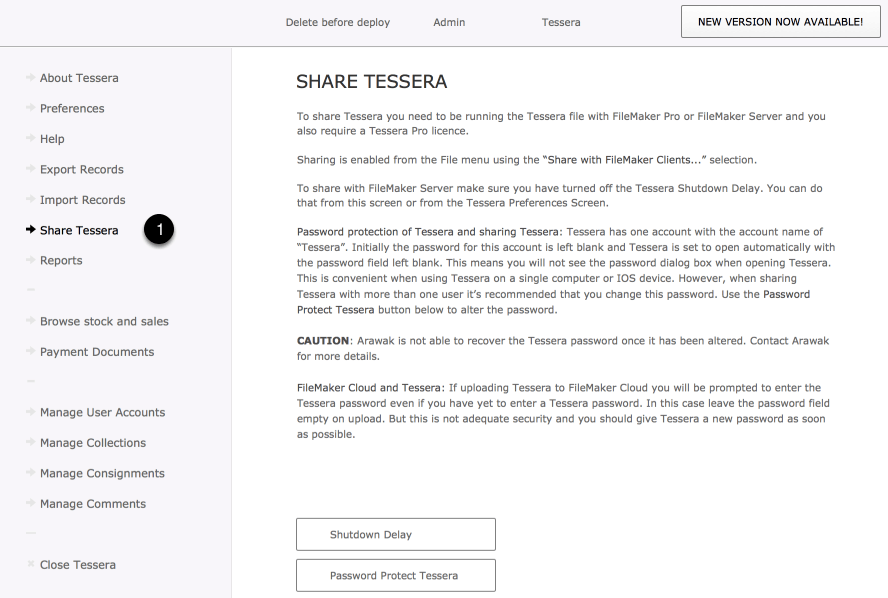
  1. From the Tessera Home Screen under Preferences use the Sharing button.

FileMaker Pro Server and sharing Tessera

FileMaker Pro Server is a server solution for managing larger networks ensuring data integrity and backups that makes it the best option in any circumstances but is certainly the only option to consider if you plan to have more than five users at any one time and want to ensure Tessera functions as expected. With FileMaker Server you also have the option to allow users access to your FileMaker Pro database using a web browser. FileMaker Pro Server and offer additional security and features that suit larger organisations where security and stability are particularly important. Ideally FileMaker Pro Server will live on it’s own workstation along with a copy of Tessera. This way FileMaker Pro Server can provide a stable and secure platform for users to log-in as guests. Each guest of the Tessera data file will need a copy of FileMaker Pro or a copy of FileMaker Go if they are on an iPad or iPhone.

Let someone else handle the sharing of Tessera

There are many companies that will host your FileMaker Pro solution for you allowing you to access the Tessera data file from wherever you are as long as you are online. This way you don’t need to manage and support the hardware and software required to run Tessera and there are addition benefits for when it comes to security and backup.

For more details on sharing FileMaker Pro files see these resources from filemaker.com.

FileMaker Cloud and Tessera

FileMaker offers a solution to host Tessera using FileMaker Cloud. Using Amazon Web Services you can be walked through the setting up of FileMaker Pro Server on the web and then hosting your Tessera file.

Watch this video from FileMaker for more details.

Sharing Tessera 2018-05-02T16:01:08+10:00

Tessera 402

2016-11-21T00:41:22+11:00

Alterations

Amended “Import folder of images” step when using the Artwork Image Manager so it works as expected.

Tessera 402 2016-11-21T00:41:22+11:00

Artwork List- View

2016-11-15T13:37:06+11:00

This List – of artworks is an ideal way to review and sort a number of artworks at once. Use the button provided on the List – screen to select which field appears in the left-most column.  The first three choices in the menu result in bold titled columns. Selecting to sort these, and other bold columns, results in summarised details. Couple this with using the Hide Sold Artworks button to quickly review groups of available artworks.List viewSelect field

Artwork List- View 2016-11-15T13:37:06+11:00