Artworks can be entered by importing data from a variety of sources but usually users will be adding an artwork one at a time. (See Import and Export section for more import details).
- To create a new artwork either use the Keyboard shortcut of Cmd-N or use the New button on the Navigation bar.

Entering a new artwork
When the new artwork creation screen loads no artwork record has yet been created. Cancelling from this screen means no new records are added to Tessera. Only once you have committed the entry, with the button provided, is an artwork record created.
The new record can be edited on the Artwork Edit screen at any time after creation, which is where you will be taken immediately once the record is saved.
Auto Entry: Tessera learns from previous entries and will automatically enter the last details used for the current artist for several of the fields including Owner, Medium, Location and Category as these fields will often contain the same values from one artwork to the next. This helps speed data entry and accuracy.
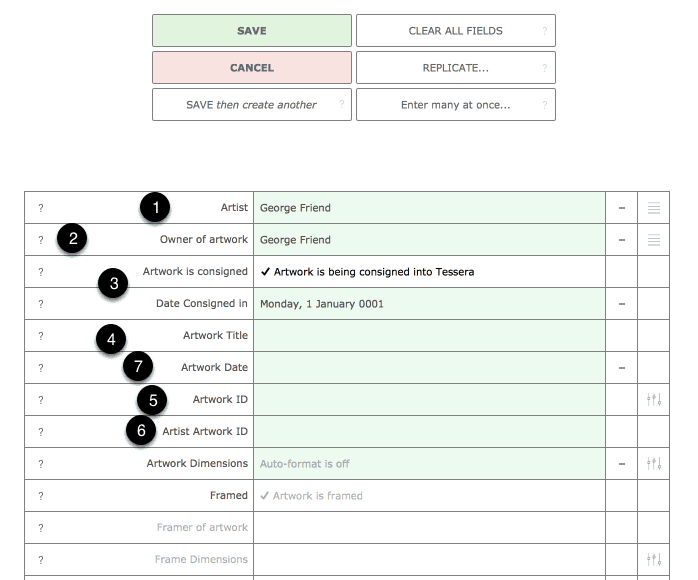
- Enter the Artist for this artwork. (Artist name not in the drop-down list for artists? Use the adjacent button to the field to add or amend the names available in this list).
- Enter the Owner of the artwork. This is the person who owns the artwork at the time of the sale. (Owner name not in the drop-down list for owner? Use the menu button adjacent to this field to add or amend to the list of names available).
- Are you a gallery and has this artwork been consigned to you? Use this checkbox.
- Artwork Title: The name of the artwork can be placed into “quotation marks” if required.
- Artwork ID: This is where the ID of the artwork you are about to create is entered. Use the adjacent button to this field to control the automatic entry of the next artwork ID.
- Artist Artwork ID: Any other ID this artwork may have. Usually the ID the consigning artist may have given this artwork.
- Artwork Date: The date of the artwork which can be in any format that suits your requirements from “2014” to “1858-1859”.
Other fields available
- The Category, Medium and Location for this artwork. See the general help section on artworks for more details on these fields.
- Status. An additional field for categorising artwork. (eg. “On Loan”) See the general help section on artworks for more details.
- Dimensions. Enter dimensions in any format you require. Use the settings button adjacent to this field to control the feature that allows dimensions to be automatically formatted as you enter them.
- Images. Artworks can have any number of artworks attached but when creating an artwork only a few artworks can be attached. Drag or paste an image into this field or use the button provided to find an image.
- Edition. See below for more details.
- Stock Level. Artworks should have a stock level of at least one at the time of creation. Stock levels can be amended at any time after the artwork has been created.
Creating a new artwork continued
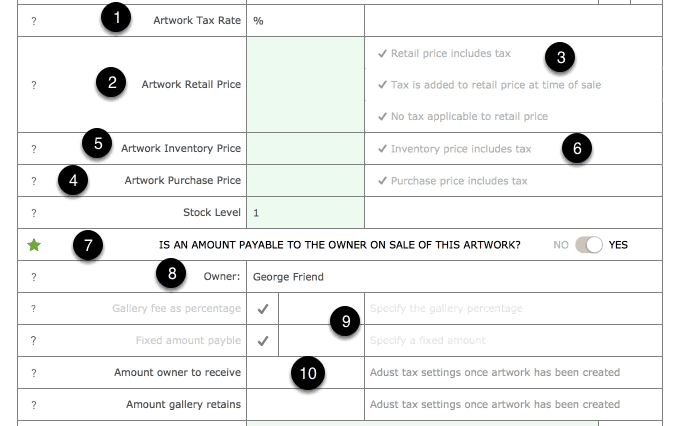
- Tax Rate This is the default you entered in the Preferences section of Tessera.
- Retail Price. Once an artwork is committed you’ll have the option to enter more details. Specify the tax status for the retail price.
- Tax Setting. Control how tax is applied to this artwork. Use this button to specify whether tax is included in the price. The default is controlled via Tessera Preferences.
- Purchase Price: The amount paid for this artwork. Used for galleries and collectors.
- Inventory Price: The price used for calculating the inventory value of the artworks. Consider this as the wholesale price for artworks.
- Tax Setting: Control how tax is applied to this purchase price and inventory price. Use this button to specify whether tax is included in the price. The default is controlled via Preferences.
- Amount Payable: If there is a Owner specified on this screen and the Amount Payable checkbox is selected then Tessera assumes that an amount is payable to the owner and this section will be populated by fields that help you specify what is required to be paid on sale of this artwork.
- At this stage Tessera assumes an amount is payable to the Owner of the artwork. This can be altered once the artwork has sold.
- Enter a gallery percentage or the whole amount payable when this artwork sells.
- Review the amount the artist or owner is to receive once the artwork has sold. These amounts will probably be altered by you once the artwork has sold especially if discounts are applied.
Other fields and Custom fields
Other data entry fields are documented on screen while Tessera allows the user to add data to up to 10 of the custom fields they may have added to Tessera.
Adding Editions
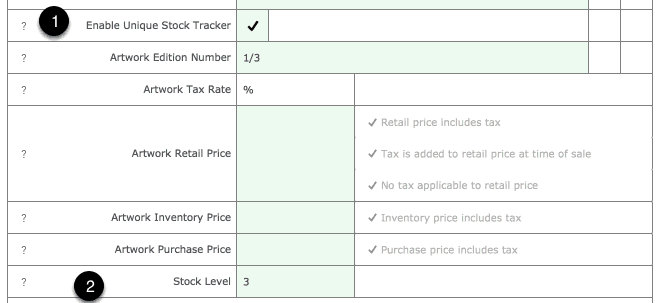
- If this artwork is part of an edition make sure the Tracker is enabled. Now add the edition number for the first artwork in the series. It may be you only have one artwork edition to enter.
- Enter the total number of artworks to add. A single artwork will be added with individual items of stock added for each edition. Each edition will be given the appropriate edition number. Edition numbers can be edited once the artwork has been saved.
Create More Artworks
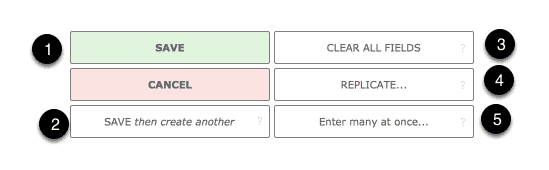
- Use the Save This Artwork to commit this artwork.
- Save the current artwork and return immediately to this screen to add another artwork. This helps speed data entry.
- Clear data from all fields on this screen.
- Duplicate the last artwork entered. If you’re entering a number of artworks by the same artist then most of the fields will contain the same data so using this button then helps remove the need to add data to many of the fields.
- Use when you want to add many artworks with similar details at once.