Import People records into Tessera before attempting to import artwork records as Artworks depend on finding and linking to the appropriate artists and owner records in the People Component..
Artist Names and how to speed up the time taken selecting artists.
This is useful if you are importing a large number of artworks with many different artists. If you are a single artist importing a collection of artworks all created by yourself this will not be of use.
When you import artwork data into the Artwork section Tessera will use the name you import into the Artist Last Name field and will attempt to match it with a record that has the same information in the Last Name field of a record you’ve already imported into the People Component of Tessera for those records where the person is marked as an artist.
If the import into an artwork record’s Artist Last Name = Last Name of an entry the People Component, where that record is marked as an artist, then Tessera will lookup and enter the correct artist name for you which will save you time where large imports are being made.
(Note: Tessera only looks for this link at this point of the import. Once your data is imported serial numbers are used and you can safely alter artist names with no effect on how Tessera works).
Things to consider when attempting to match artist entries
- There has to be an exact match between the Artist Last Name in the artwork import and the Last Name in the People record.
- Tessera ignores case. eg. Sortern will match sorteRn or sorteRn.
- Even if a surname is unique Tessera will not make a match if the record in the People component of Tessera is not marked as an artist.
- Tessera ignores spaces before or after names.
- Check the entries in the People Component marked as artists and ensure the last names are displayed as expected before importing artworks.
- If you have two artists with the same Last Name then you will need to adjust these the import page details manually.
Custom Fields
Tessera features the ability to add virtually an unlimited number of custom fields to store data within Tessera. On import there are ten of these custom fields available. Once you’ve imported data into these fields you’ll have the chance to specify what these fields are for before committing them to Tessera.
Fields available for import
This is a list of the names of the fields into which you can import data.
These fields are all text fields apart from the Artwork Retail Price, Artwork Purchase Price and Artwork Inventory Price fields which are numbers and the Image field which is a container designed to hold images. Image records can only be imported if you are importing from a FileMaker Pro file. (Alternatively there is an “Import images from a folder” feature which lets you import a folder of images after which you can add the artwork details.)
Artist Last Name, The last name of the artist
Artwork Title, The artwork title only
Artwork Dated, This can be a single date or an approximate date for historical artworks
Artwork Category, “Painting”, “Sculpture” or any other values you want to use to categorise artworks
Artwork Medium, “Oil on canvas”, “Mixed media” etc
Artwork ID, An unique identifier for your artwork
Artwork Other ID, The ID an artist may have already given to this artwork
Artwork Retail Price, The price for which the artwork will sell
Artwork Purchase Price, The amount you purchased this artwork for (useful for galleries and collectors)
Artwork Purchase Date, Format dates as 30/12/2014
Artwork Dimensions, Use any format suitable for your needs
Frame Dimensions, For consistency use similar formatting to general artwork dimensions
Location of Artwork, “Stockroom”, “Studio” useful for running inventory reports
Inscriptions, Where and when artwork signed. (“Signed and dated on reverse”)
Provenance, The history of the artwork
Literature, Reference in publications for this artwork
Collection Details, Are you recording details of an artwork that belongs to a collection?
Artwork Source Details, For galleries to collectors of historical works from where was this artwork sourced?
Image, The image for this artwork. (Note images can only be imported from another FileMaker file or directly either one by one or as a folder of images without accompanying text.
Image Name, Have you a spreadsheet full of artwork details and an accompanying folder of artwork image? Use the Image name field to record the name of the image. This way during the import process this will make it easier to find and enter the relevant image.
Custom 01, Tessera can hold any number of custom fields for holding other data use these fields for that data and once you’ve imported the records you can specify the names of the fields.
Custom 02
Custom 03
Custom 04
Custom 05
Custom 06
Custom 07
Custom 08
Custom 09
Custom 10
Pre-formated Excel spreadsheet
TIP: Are you a gallery regularly having artists sending you in artworks? Help speed the process by encouraging artists to download the spreadsheet and enter the data into the required fields. You won’t need all of the cells filled so specify in your email what you do require. The spreadsheet includes a column where the artist can enter the name of the image associated with the artwork. That way if they send you the images as well you’ll find it easy to locate and enter the correct image during the import process. To simplify life simply ask your artists to provide a spreadsheet with: The name of the artwork, the quantity and the retail price. Once this is imported the import features in Tessera will allow you to fill other fields rapidly.

You can download a pre-formated Excel Worksheet for importing artworks here. The pre-formatted Worksheet doesn’t include a column for images, which aren’t usually stored in a spreadsheet, but does include the Image Name column to help you find and insert relevant images during the import process.
Import text data from a wide range of sources. (See FileMaker Pro support page on this topic)
Access the import feature from the home screen.
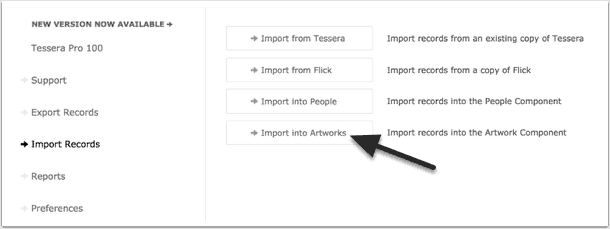
Import Features available
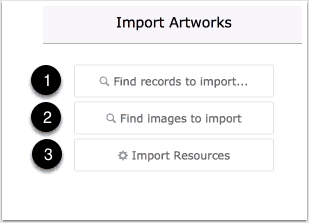
- Use this button to find artworks in a spreadsheet or in a text file to import. Common file formats used to import data into Tessera include .csv, .txt, .tab and .xlsx files from Excel.
- If you have a folder of artwork images then use this button to import them in one step you can then add text details before committing the data to Tessera.
- Use this button to display and print the fields accessible for import and access a feature that allows download of a pre-formatted spreadsheet.
Find data to import
Use the Find records to import… button to find and select your spreadsheet or other import file.
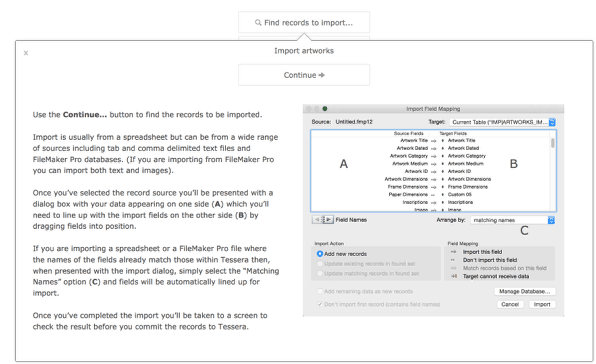
Matching Fields
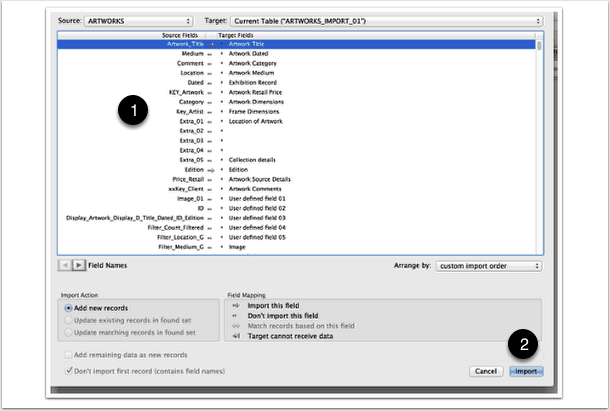
- You’ll be presented with a dialog box where you can drag fields to match them to their Tessera counterpart.
- Finally use the import button.
Check Import
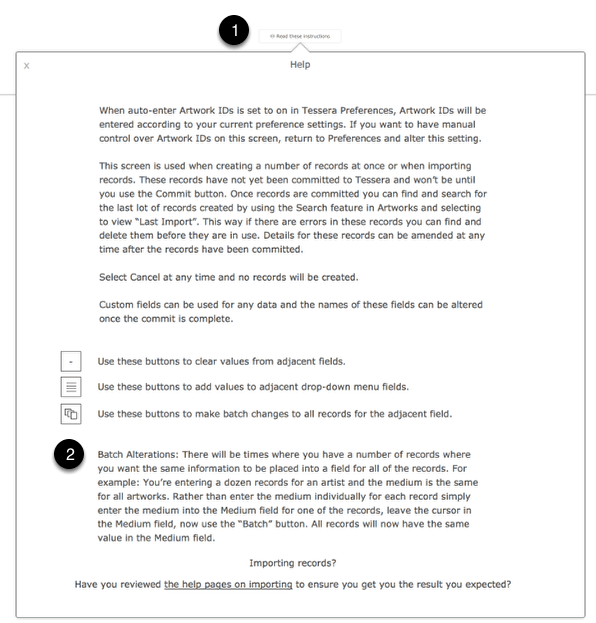
- Once imported use the Read these instructions… button to familiarise yourself with the features available.
- In particular learn how the Batch button works. This allows you to amend one field then see that same entry propagate throughout all other records which will help speed entry as well as ensuring accuracy. (You can amend fields once they’ve been imported into Tessera but the Batch button is only available with this range of functionality on this screen). For example: Amend one record on this screen so that the “Medium” field contains “Oil on canvas”. Now use the Batch button adjacent to this field and ALL records will contain the same value in the same field.
Other features available on the import screen
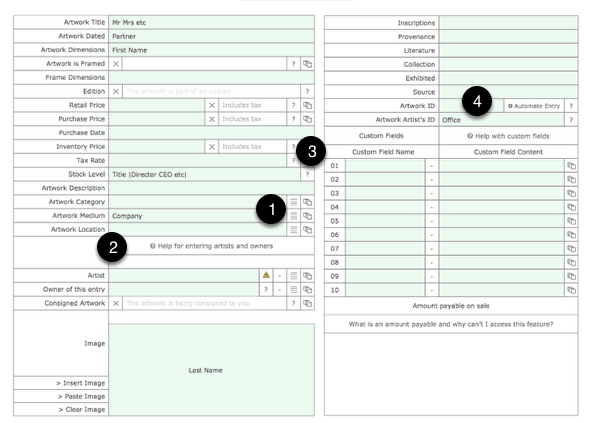
- Speed data entry by making use of these drop-down menu editing buttons that let you add entries to the list that appears when you tab into fields.
- Use this button for more details on entering artists. (See the section on entering people to Tessera to gain an understanding of how you can make the job of entering artists both easier and quicker).
- If you’ve imported data into any of the Custom fields then you will need to select an entry from the corresponding Custom field Name field. If there isn’t a Custom field Name that matches your requirements then use the feature found via the Help with custom fields button to add the fields you require. Failing to specify a name for the Custom field will result in the custom field data not being imported.
- Specify an ID for each artwork. (Tessera may not permit duplicate artwork IDs and duplicates will be appended with the word “COPY” on committing the import if you have disallowed artworks to have the same ID in Tessera’s Preferencest. If you have specified a serial number default in Preferences then this will be used with each new artwork incremented by a value of 1 meaning you have no need to enter an artwork ID on this screen. Any ID entered on the import screen will take precedence over the default set in Preferences. Artwork IDs can be amended at any time).
Commit the artworks to Tessera
Once you’re happy with the records use the Commit button and the data will be moved into Tessera.
Making corrections
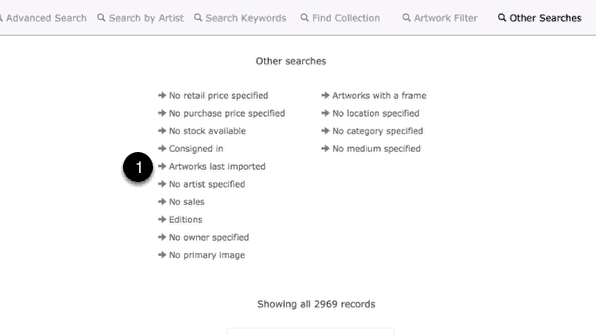
What happens when you commit 1,000s of records to Tessera and then discover there’s an error in every record? Use the Artwork advanced search feature to find all of the last imported records then use the Tools button > Delete Button > More feature to delete all of the imported records.
- Find the last records imported by using the button found under the Artworks advanced search screen.
