Mac, PC, iPad and iPhone
Mac and PC updates where user DOES own a copy of FileMaker Pro
When new versions of Tessera become available you’ll prompted to download the new version and import your existing data. The new version will be a file named Tessera xxx where xxx is replaced by the version number. You’ll be prompted to select a location to save the downloaded file. You now have two versions of Tessera.
Close your existing copy of Tessera, open the new version and select to import data from the Tessera Home Screen.
All Shortcuts (Win) or Aliases (Mac) for the original file should be removed as should any items from the Dock (Mac) and be replaced with new files once the import is complete.
Mac and PC updates where user DOES NOT own copy of FileMaker Pro
When new versions of Tessera become available you’ll prompted to download the new version and import your existing data. The new version will be contained in a folder named Tessera xxx where xxx is replaced by the version number. You’ll be prompted to select a location to save the downloaded folder. You now have two versions of Tessera.
Close your existing copy of Tessera, open the new version and select to import data from the Tessera Home Screen.
Once the import is complete you will have two copies of Tessera containing the same information.
Importing data into a new version of Tessera will remove any data you may have added, as well as demonstration records, and will then import all data from your existing copy of Tessera.
Once this update is complete the existing copy of Tessera should be backed up and the file removed from your computer so that there is no risk that you inadvertently use the wrong file. Only one copy of Tessera should exist on your computer or on your network.
All Shortcuts (Win) or Aliases (Mac) for the original file should be removed as should any items from the Dock (Mac) and be replaced with new files once the import is complete.
If you are using Tessera over a network then before an update in undertaken make sure there are no other users currently accessing Tessera.
iPad
When new versions of Tessera become available you’ll be prompted to download the new version and import your existing data. Tessera Data files are named “Tessera xxx.usr” where xxx is replaced by a three digit number representing the version. This file name should not be altered so that you are always clear which version of Tessera is in use.
Once the download is complete close your existing copy of Tessera, open the new version and select to import data from the Tessera Home Screen.
Importing data into a new version of Tessera will remove any data you might have added, as well as demonstration records, and will then import all data from your existing copy of Tessera.
If required you can move your copy of Tessera back to your Desktop, download the new Desktop version of Tessera and import your data before moving the new Tessera file back to your iPad.
See the section of installing and moving Tessera between the Desktop and your iPad for more details.
How do I know when a new version becomes available?
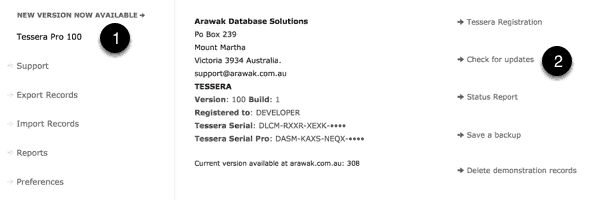
- On the Tessera Screen you’ll get notification of new versions. (You can also download the current version at any time by visiting arawak.com.au).
- Use the Check for updates button to download the new version from Tessera. The current version will then quit allowing you to open the new version and import your data.

Tips for importing your existing data into a new version of Tessera
Install, then open the new version of Tessera and follow these steps to import the existing data from your old copy of Tessera.
- Access the Tessera Screen in the new version of Tessera.
 Import Screen
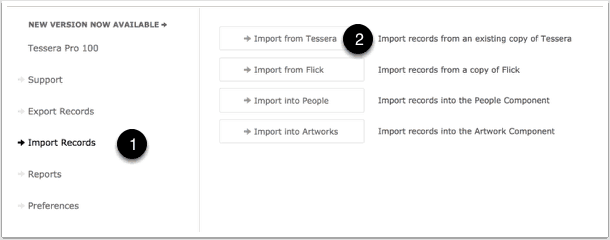
- Use the Import button to access the import screen.
- Now use the Import from Tessera button. (If security is enabled you’ll need your Admin password).

Import
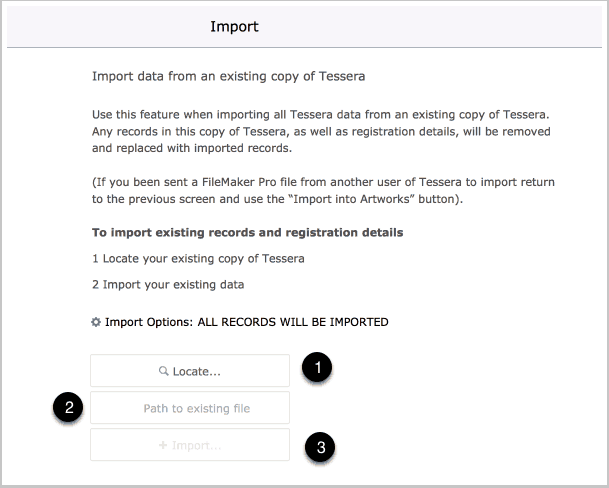
- Use the Locate… button to find and double-click on your copy of Tessera xxxx.USR that contains all of your existing records. (NOTE: Find and double-click on the Tessera xxx.USR data file, not the Tessera App).
- The path to the existing version of Tessera will be displayed here. This can be manually edited if need be. If you are using Tessera on a server you will need to shut the server down, download the Tessera file to a local disk, import the data into a new copy of Tessera, then upload the file).
- Confirm the path is correct and use this button to import your data. This will include your registration details so the new version will be again registered in your name.

iPad
The procedure is much the same as for the Desktop. Read through the notes above. You will get an alert on the Tessera Screen when an update is available and you’ll be prompted to download the new Tessera Data file at which point your current version will close and you are expected to open the new version and follow the prompts to import your data.
As with the Desktop version it is recommended that you move the old copy of Tessera off of your device and stored it elsewhere. It’s recommended to have only one copy of Tessera on your iPad or iPhone to avoid the chance of opening and using the incorrect version.
If required you can move your copy of Tessera back to your Desktop, download the new Desktop version of Tessera and import your data before moving the new Tessera file back to your iPad.
See the section of installing and moving Tessera between the Desktop and your iPad for more details.
